
As an Amazon affiliate, we earn a commision from qualifying purchases.
If you’re trying to fix your Maytag Bravos MCT washer yourself, it is a good idea to put it into diagnostic or self-test mode – it’s one of the easiest ways of finding out the different faults and errors that the washer could have if it has broken down.
With that in mind, below are step by step instructions on how to run Maytag Bravos MCT washer diagnostic mode (and run an automatic test cycle operation).
Maytag Bravos MCT washer diagnostic mode – step by step instructions
There is something I want to set straight before we look at the steps…
Now, the tests performed once you start Maytag Bravos MCT washer diagnostic mode verifies all inputs to your machine’s main control board and can point you in the right direction.
That being so, the best thing is to run these quick and overall check-up procedures on your washer before you try any specific troubleshooting tests.
So here is the procedure..
Step by step instructions
Before you start!
Be sure the washing machine is in standby mode(plugged in but with all the indicators off).
Steps
Now perform the sequence of movement below using the main cycle selector knob.
Important: After RESET, sequences “a” through “e” have to be completed within six (6) seconds.
Step 1: Reset
The very first thing you need to do is RESET any saved sequences.
To do so, simply Rotate the main cycle selector knob counter-clockwise (left) one or more turns (clicks) to clear sequence(s).
Note that you rarely need to go full turn counter-clockwise to reset- it should effectively reset once you make one or two turns counter-clockwise.
Step 2: Sequence “a”
Next, turn the cycle selector knob right (clockwise) one click then wait ½ second.
Step 3: Sequence “b”
Rotate your cycle selector knob right (clockwise) one click once again then wait ½ second.
Step 4: Sequence “c”
Rotate your cycle selector knob right (clockwise) one click one more time and be sure to wait ½ second once again.
Step 5: Sequence “d”
Turn your cycle selector knob left (counterclockwise) one click and again wait ½ second.
Step 6: Sequence “e”
Turn your cycle selector knob right (clockwise) one click to enter service/self-test mode.
That’s it..you have just instructed it to enter Diagnostic Test Modes.
How do you know that Diagnostic Test Mode has successfully been activated?
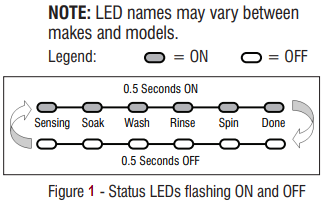
Well, it’s really simple: All LEDs (but for Lid Locked) will start to blink ON / OFF in ½ second intervals (see the following image).
What should I do if Maytag Bravos MCT washer diagnostic mode did not activate with the above sequence?
Don’t worry if the LEDs did not display as mentioned above..
If they did not, the most probable reason is failure to complete the indicated sequence within 6 seconds.
Accordingly, just repeat step 2 (sequence “a”) through to step 6 (sequence “e”) and ensure you have run through all the steps within 6 seconds.
There is a big chance you will be successful this time.
More about what happens during the Diagnostic Test Mode
Knowing what exactly happens during the diagnostic test mode can help you diagnose your washer fast.
Here is what you need to know:
There are a couple of diagnostic test modes in your washer and you must select the proper one to save time.
These are described in the following chart:

Please select the mode of test operation you wish to run by turning the main cycle selector knob till the LEDs -or the display, if your washer has one- match the specific mode you want to enter.
Don’t forget to press “START” button to actually enter your desired mode after you have selected it (as explained above).
Maytag Bravos MCT washer diagnostic modes explained
So that you can make the right selection, here is a short description of what each of the commonly used modes of operation does (where each mode takes you):
Fault (Error) Code Display Mode
This shows myriad error/fault codes.
To enter Fault (Error) Code Display Mode, turn the dial until the LEDs/Display corresponds as shown below:

To be clear, all error codes in this washer typically have an F# (indicates the System/Category that could be the origin of problems) and an E# (E# points to the defective component in the troubled system/category)
Error numbers can also be shown as you can see here (with their meaning).
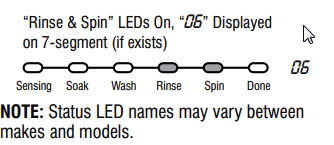
Automatic Test Mode
While in automatic test mode, your washer performs an automatic test (with water cycles) to check if all the major washer functions are okay.
To enter automatic test mode, turn the knob until the LEDs/Display corresponds as shown below:
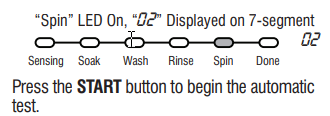
Remember to press “START” to advance manually to the next test/step.
Quick Heads Up: The lid must be shut (with lid-lock enabled) to perform the test.
Manual Test Mode
Entering manual test mode will have all washer outputs OFF for testing.
You use the main cycle selector knob to choose the output you want to test.
In addition, the START button activates/deactivates the selected output (When the output you select is activated, the matching status LEDs flashes ON & OFF).
To enter manual test mode, turn the knob until the LEDs/Display corresponds as shown below:

Quick Note: As an extra safety feature, close the lid (and enable lid lock) if you will be activating either Agitate / Spin Test.
Calibration Mode
Calibration must be carried out if you have replaced any of these components: Drive assembly, Suspension, Main control, Basket, Motor, and Capacitor.
This prevents poor wash performance.
To enter calibration mode, turn the knob until the LEDs/Display corresponds as shown below:
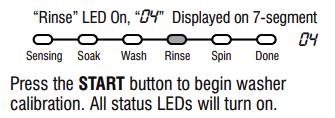
Quick notes:
#1- Do NOT interrupt the calibration process, or disturb the washer, or even remove power once the washer is calibrating. You must repeat calibration if you do.
#2- The lid needs to be down when performing the test.
#3- The wash basket must be completely emptied before calibrating (no water /clothes).
#4- The calibration cycle usually runs for around 2-4 minutes and completes when the door unlocks and your appliance enters standby mode.
UI Test Mode
This tests the washer’s user interface (if it is acting up).
To enter UI Test mode, turn the knob until the LEDs/Display corresponds as shown below:
Upon putting it into UI test mode, the washer will have all LEDs (and display, if it’s there) turned ON.
How to exit Maytag Bravos MCT washer diagnostic mode
Exiting the service/ diagnostic test modes is straightforward: Just press the “POWER” button at any one time as the test runs.
Bear in mind that your washer will automatically exit the diagnostic test mode after five (5) minutes of inactivity (or once the power cord is unplugged).
Final words
Running diagnostics in your washer can save you from making a costly service call or buying a brand new washer.
Follow the above steps and if they do not work- they do work for quite a number of Maytag Bravos MCT washer modes-check your Maytag Bravos MCT washer tech sheet for the correct procedure.
ALSO READ:
How to reset Maytag Bravos washer (Maytag Bravos MCT washer reset steps and tips)
Maytag Washer Door Lock Problem [Fixed]
Won’t turn on
Display not lighting up