
As an Amazon affiliate, we earn a commision from qualifying purchases.
Below is how to test console and indicators on Maytag Bravos washer models…
This test is helpful when any of these issues occur when you run UI Test Mode:
- Not a single LED light up
- One(or more) Status light emitting diodes (LEDs) are flashing
- Turning rotary switch won’t toggle LED
The purpose of the test is obviously to help you diagnose what’s causing UI problems accurately..
How to Test Console and Indicators on Maytag Bravos washer
Test 1: No LEDs light up
- Unplug the washer (or disconnect power).
- Access the main electronic control and visually verify that ALL the connectors are inserted into their appropriate headers (they should be inserted all the way).
- Next, visually confirm that the washer’s main control assembly has been properly connected to the console(inserted).
- If the above visual checks pass, perform Test #1 (Main control testing) to check the main control for correct supply voltages.
- Lastly, to verify the repair, start Service Diagnostic Mode then run the UI Test Mode (see instructions in this article-read it to the end).
Test 2: One (or more) Status LEDs are blinking/flashing on and off
If you have noted status LEDs flashing (on and off) in about 0.5 second intervals, follow the notes below to determine the switch(es) that could be having a problem.
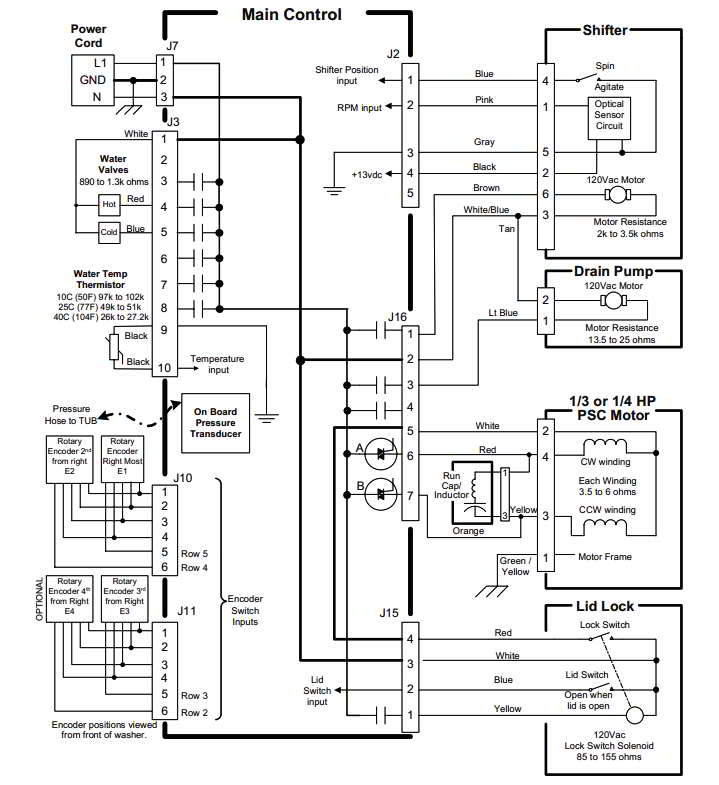
Please follow along with the wiring diagram at the end of the article when performing these procedures..
- Double-check that the switch connector has been inserted into the main control(all the way)-reinsert properly if needed.
- Next, check the harness -between the switch & main control- for continuity. Also, check for shorts.
- If continuity is there and there are no shorts, replace the switch.
Now, if this does not eliminate the issue, go ahead and change out the main control.
Quick Notes
NOTE 1: The number, as well as location of the rotary switches, varies from one model number to the next.
NOTE 2: Regardless of the location, switches should be read from the left to right(the pressure switch is not to be counted), with the left most switch being #1.
NOTE 3: Each rotary switch -and cycle selector knob- is represented by the status LEDs below:
- Rotary Switch #1-toggles(1) Fill LED
- Rotary Switch #2-toggles(2) Wash LED
- Rotary Switch #3-toggles(3) Rinse LED
- Rotary Switch #4-toggles(4) Spin LED
- Cycle Select Knob-toggles(5) Done LED
NOTE 4: The Status LEDs names might vary between different models so use the LED # for identification.
Test 3:Turning rotary switch won’t toggle LED
Perform the procedures indicated under “One (or more) Status LEDs are flashing/blinking”.
Maytag Bravos washer Wiring Diagram

ALSO READ:
How to test water inlet valves on a Maytag Bravos washer (Test 2)
How to test the control board On Maytag Bravos washer (TEST #1)