
As an Amazon affiliate, we earn a commision from qualifying purchases.
Below we look at the frequent Chigo air conditioner problems and solutions to help you restore the unit’s optimal performance.
Chigo air conditioner problems – the primary issues and how to fix them [Ultimate chigo air conditioner troubleshooting guide]
1. Air conditioner compressor shuts off after a few minutes
If your unit shuts down after just a few minutes, it could be that:
- Your appliance is overheating: This is mostly due to the accumulation of grime inside the compressor. It may also be caused by a refrigerant leak.
- Malfunctioning thermostat: The wiring on your thermostat may be destroyed or there could be some electrical problems. You may also have wrong thermostat settings.
Recommended Troubleshooting
- Clean the compressor – it’s advisable to clean it ahead of every summer.
- Add refrigerant– check (and top up) the coolant level. You may want to involve a pro if unsure of the steps.
- Troubleshoot the thermostat- check its settings (and adjust appropriately), examine its inner components for dirt (and clean), check and repair the wiring, or replace it if nothing works.
2. Chigo Air Conditioner Not Turning On
Your Chigo air cooler may not turn on if:
- The fuse of your power switch has burnt out.
- Batteries of the remote controller are exhausted or there are other problems in the controller.
Recommended Troubleshooting
- The fuse should be changed
- Replace the batteries or the controller.
Note: Sometimes the unit fails to run immediately power is restored (after an outage) as the memory has been cleared. If this happens to you, try to start it using the remote controller- it often works.
3. Chigo air conditioner not heating
Here are the various possibilities for heating-related Chigo air conditioner problems and what you can do if it won’t warm the room..
- The filter is clogged: Clean the air filter as per instructions in your specific chigo air conditioner manual.
- The equipment’s air flow is hindered: Make sure the unit’s air flow is not blocked by anything- clear any drapes and furniture hindering air flow.
- There is dirt in the heat/cold exchanger or even the fan: Check the heat exchanger and the fan for dirt and clean them.
- The external fan has jammed: confirm if the fan is working. If it’s not, the culprits may be a bad capacitor, a burnt out motor, broken/loose belt, power issues, etc.
Other potential causes and solutions
- Doors and windows have not been completely closed– close them.
- Refrigerant is leaking or it’s not enough– Check for leakage and recharge the refrigerant rightly.
Note that this may also happen when the outdoor temperature is below certain limits.
4. Air flowing normally but can´t cool (Chigo r410a air conditioner and many other Chigo models) enough
This could mean that the temperature is set incorrectly.
Besides:
- The outdoor unit as well as the indoor unit heat exchanger or the air filter may be dirty.
- Windows and doors could be open.
- The inlet/outlet of the indoor/outdoor units may have been blocked.
- The sun may be shining directly on the unit.
- A source might be generating too much heat.
- The outdoor temp. could be extremely high.
- Refrigerant might be leaking or insufficient.
Recommended Troubleshooting
- Adjust the temperature properly.
- Clean the unit’s heat exchanger.
- Pop the air filter out and clean it.
- Close all the open doors and windows.
- Install curtains to shield it from direct sunshine.
- Reduce the heat coming from the source.
- Check for leakage and recharge the refrigerant rightly.
5. Units start or stops frequently
This is one of the most common Chigo air conditioner problems and it might be triggered by any of these issues:
- The refrigerant in there may be too much/too little.
- The compressor has malfunctioned.
- The voltage is either too low/very high.
- System circuit has been blocked.
- Air/gas within the refrigerating circuit.
Recommended Troubleshooting
- Check for leakages and recharge refrigerant rightly.
- Maintain (clean it, check for and tighten any loose parts, etc.) or change the compressor.
- Install a Manostat (for voltage issues).
- Identify the cause of the system circuit blockage and eliminate it.
6. Noise-related Chigo air conditioner problems
The noise you’re hearing from the unit could point you to a couple of simple-to-troubleshoot Chigo air conditioner problems.
Here is what the various noises mean and what to do:
Nature of noise |
Potential Chigo air conditioner problems |
| Whistling noises | This shouldn’t worry you much. It simply tells you there’s some pinhole air leak which may not be too problematic. |
| Bubbling/wet noises | Condensate drain line/ refrigerant line damaged/leaking |
| Clanking or clattering | A part has is loose or severely damaged |
| Squealing sounds | Worn out, destroyed, or out-of-date belt |
| A shrill | Bearings lack lubrication |
7. Chigo air conditioner leaking water
The main cause of a Chigo AC leaking water is clogging in its condensate drain line- it may be clogged with mold, sludge, dust, etc.- and you must unclog it to stop the leakage.
Try to use a wet/dry vac or any other suitable tool to unclog the condensate line and see if it helps.
There are other suspects too including a damaged drain pan or a broken condensate pump. Check them and replace the affected part.
CHIGO AC error codes
Another easy way of tackling most Chigo air conditioner problems is by checking what the error code is then focusing on the problem area the error code is pointing to.
Below is a tabulated summary of various CHIGO ACs error codes and troubleshooting ideas for some of them.
CHIGO DC Inverter Split type A/C error codes
Error code |
Potential Chigo air conditioner problems |
Additional signs |
| F1 | Communication problems in the
Indoor and outdoor units |
While the indoor digital tube shows F1, the outdoor LED may flicker 15 times
|
| F2 | Indoor ambient temp. sensor
fault |
|
| F3 | Indoor coil temp. sensor fault
|
|
| F4 | Fault in the Indoor fan | |
| F5 | Issues in the outdoor module | |
| F6 | Outdoor ambient temp. sensor
fault |
compressor shuts down |
| F7 | Outdoor coil temp. sensor fault | compressor shuts down |
| F9
|
Issues in the compressor discharge temp. sensor | |
| FC | Abnormal compressor drive | compressor shuts down |
| FF | Other issues but the above |
Recommended troubleshooting procedures for the above common chigo air conditioner error codes
Error code F1- communication issues in the indoor and outdoor units
There was no data sent between the two units for 3 minutes continuously.
Main causes
The wires between the two units are wrongly connected, the communication line may be loose, or you’re looking at a broken voltage regulator.
Troubleshooting steps
- Check if the connection between the indoor and outdoor unit has been done correctly. If not, adjust and test again.
- Check if the inserter part of the PCB is loose and fix it.
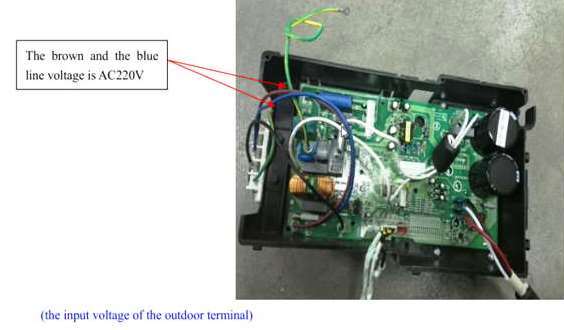
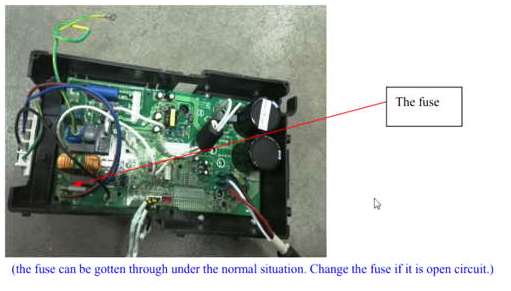
- Test whether the AC voltage of the outdoor PCB is fine or if the fuse has come loose or it’s blown out.

- Replace the outdoor PCB if everything mentioned above turns out fine.
Error code F2: Indoor ambient temp. sensor fault
In this case, the sensor wire may be loose or badly contacted. In addition, the temp sensor might be damaged.
Troubleshooting methods
Method 1: Check for loose sensor wire
Check if the sensor wire has grown loose and repair, if so.
Method 2: Check the resistance
Check the temp sensor’s resistance (first remove it).
There could be issues with the sensor if there’s an open-circuit, a short-circuit, or the value is abnormal.
The sensor may even be damaged and has to be replaced.
Method 3: Replace the indoor PCB
If everything looks fine this far, replace your indoor PCB.
Error code F3: indoor coil temp. sensor fault
Again, the sensor wire may be loose or badly contacted. The other possibility here is the temp sensor itself being broken.
Troubleshooting Tips
Repeat the steps we have highlighted for error code F2.
Error code F4: Indoor fan fault
This indicates that the feedback pulse signal is not coming from the indoor fan after 30 seconds. The fan will, therefore, stop.
Troubleshooting methods
Method 1: Test output voltage
Power on the unit and start it.
Test the indoor corresponding terminal for output voltage. You should replace the indoor PCB if no voltage.
Method 2: Test resistance (alternative)
Remove the indoor fan’s motor terminal and test if the resistance value of the winding is ok.
Again consider replacing the fan motor if it’s not.
Note: You should install a new indoor PCB if changing the fan motor doesn’t help.
Error code F5: Outdoor module fault
The problem may be between the drive circuit and the outdoor PCB.
Troubleshooting tips
Method 1: Check for proper contacting
Now, for those units where the drive module is separated from the outdoor main board, start by checking if the connection (6 cores) between them is proper and repair it, if necessary.
Method 2: Replace the drive board
If you’ve found the main board to be OK, consider replacing the outdoor drive board.
Error code F6: Outdoor ambient temp. sensor issue
This could be due to the outdoor ambient temp rising over 55℃ or going be -20℃.
Troubleshooting methods
Method 1: Check for loose sensor wire
Check if the sensor wire has come loose and repair, if so.
Method 2: Check the resistance
Check the temp sensor’s resistance (first remove it).
There could be issues with the sensor if there’s an open-circuit, a short-circuit, or the value is abnormal.
The sensor may even be damaged and has to be replaced.
Method 3: Replace the indoor PCB
If everything looks perfect this far, replace your outdoor PCB.
Error code F7: Outdoor coil temp. sensor fault
The outdoor coil temp. sensor may experience issues anytime the outdoor pipe temp hits or exceeds 54℃ or goes below 20℃.
Troubleshooting methods
Method 1: Check for loose sensor wire
Like with other sensor problems, a loose sensor wire may the culprit. Check and repair, if so.
Method 2: Check the resistance
Proceed to Check the temp sensor’s resistance as described earlier if not successful and replace it, if necessary.
Method 3: Check for missing/damaged components
If the sensor seems ok, the issue may be as a result of missing or damaged parts in the corresponding integrity circuit.
Check every component and replace all destroyed or missing pieces.
F9 error chigo air con : Outdoor coil temp. sensor fault
The issue often arises if the compressor discharge temperature exceeds 120℃ or is less than 0℃.
Troubleshooting methods
Repeat the troubleshooting steps for error F7.
FC error code: Compressor driving abnormally
The compressor may be failing to run as it should.
Troubleshooting methods
Method 1: Check the connecting wire
Check if the connecting wire on the main drive board is in good condition and repair/replace if necessary.
Method 2: Check the screws
Check whether all the screws on the main drive board are fixed properly and fix those you find having issues.
Note: Don’t use a lot of force when working on the screws as it may crush the module.
Method 3: Check for voltage
Test if there’s proper input voltage on the drive module (check your manual for correct input voltage).
You should replace the controller if the voltage is wayward.
Otherwise, you may have to replace the drive module (for Chigo ACs where the outdoor controller is separated from the drive module) or the whole board (if there’s only one board).
Error code FF: Other Chigo air conditioner problems
Here now are other Chigo air conditioner problems that you may think about when your Chigo split air conditioner shows the error code FF..
- Lack of sufficient refrigerant
Your appliance may be malfunctioning because of having insufficient refrigerant.
This is a real possibility if you notice leaks on the weld (or blocked weld).
Another sign is reduced pressure in the entire system.
- Faulty 4-way valve
If the refrigerant looks OK, proceed to check whether you have a damaged 4-way valve and replace, if needed.
- Faulty PCB
Replace the PCB if the valve appears fine and you’ve found enough refrigerant.
Error code list for the indoor unit (DC Inverter ceiling-mounted Chigo cassette type air con)
Here now is an error code guide to give you an idea on faults affecting the indoor unit in a DC Inverter ceiling-mounted Chigo cassette type air con.
Error code |
Interpretation |
Other symptoms |
| E0 | Three-phase power phase sequence fault | – |
| E1 | Indoor & outdoor unit communication failure | Timing lights flash |
| E2 | Temperature sensor (T1) issue | Running lights flash |
| E3 | Pipe temperature sensor(T2) in the evaporator problem | Running lights flash |
| E4 (including Chigo portable aircon error E4) | Pipe temperature sensor (T2B) in the evaporator fault | Running lights flash |
| E5 | Outdoor unit failure | Warning lights flash
slowly |
| E7 | EEPROM issue (in the indoor unit) | Defrost lights flash slowly |
| EE | Water over protection | Warning lights flas |
| E9 | failure in communication between the indoor unit and line controller |
Maintenance and servicing your DC Inverter ceiling-mounted Chigo cassette type air con
Chigo recommends the following maintenance procedures to keep your unit in tip-top condition..
Sweep the air filter screen frequently
This is important because a blocked screen could hinder proper air circulation messing the cooling/heating effect.
Besides, excessive dirt on the screen might make your air conditioner fail.
So: wash the screen before using the unit if you’ve not used it for months.
Then: wash the screen at least once every 2 weeks during normal use.
Cleaning procedures
- Remove the filter screen;
- Sweep it with a dust collector or wash with water (the water shouldn’t be too hot otherwise you risk deforming the screen or making it to fade).
Notes:
Let the part dry before reinstalling it if you’ve cleaned it with water- simply place it in a shaded place and wait for it to dry.
Most importantly, never attempt to dry it with the fire as it can easily catch fire.
Preparing it for storage
Do the following at the end of season:
- Start the air con and set it to air supply mode. Let it run for about 3-4 hours. You can now proceed to dry the air inside the air con fully.
- Turn off your air con and disconnect the special power supply.
- Next, clean the filter screen thoroughly together with the indoor unit.
- Remove the remote controller battery and store the remote controller in a safe location.
- Lastly, use a protection hood to cover the outdoor unit. This keeps the dust away.
That’s all..your unit is now ready for off-season storage.
Chigo VRF error codes
Our last table contains the most common Chigo VRF error codes.
Error code |
Interpretation |
Other symptoms |
| FE | No address when the indoor unit powers on for the first time | |
| EA | Compressor overflow issue | |
| E1 | Indoor & outdoor unit communication error | Timing lights flash |
| E2 | Temperature sensor (T1) issue | Running lights flash |
| E3 | Temperature sensor(T2) issue | Running lights flash |
| E4 | Temperature sensor (T2B) fault | Running lights flash |
| E5 | Outdoor unit failure | Alarm lights flash
|
| E6 | Zero crossing detection error | |
| E7 | EEPROM issue | Defrost lights flash |
| E8 | Indoor fan motor issue | |
| E9 | failure in Wired controller communication (Main board is unable to communicate to the display board) | |
| EE | Water level detection issue | |
| EF | Other faults e.g. mode conflict |
Do’s and Don’ts
- DON’T: Avoid starting the compressor frequently (do not exceed 5 times in an hour) as this can hurt the air con’s service life.
- DON’T: When cleaning the whole unit, do not use chemicals such as benzene because they may cause button failure or fading. We should add that the best way to clean it is by wiping the various surfaces with a wet towel/cloth- you should only wet it with water or a neutral cleaning agent.
- DO: Carry out the periodical maintenance as indicated in the manual to keep the air con running normally for the longest time possible.
- DO: Always cut off the unit’s power supply before running any maintenance processes on your Chigo air con.
Chigo air conditioner reset
Resetting your unit is an easy way to clear quite a number of Chico AC error codes.
You can reset it as follows:
Troubleshooting Chigo air conditioner problems – Final thoughts
Some of the issues arise in incorrectly mounted units and it is important to mount the unit properly (your Chigo air conditioner installation manual should be very helpful here).
The other thing you should keep in mind is that most of the error codes duplicate across many models from this brand including Chigo portable AC units so you should implement the suggested troubleshooting procedures before thinking of inviting a pro.
Sc code what is meaning
My Chigo is about 8 years old and stops working saying E8! What am I supposed to do? I live in Dublin,Ireland.
Hello
I have chigo air conditioner
10 pis mor
Fult
Help me pilz
India
919376645454
My Chigo mini split air conditioner indoor unit not spinning , the running indicator is blinking but out side unit is running, this happens when the heat mode is on, cooling is no problem when I switch the mode to cooling
chigo 3 hp floor split non inverter…
condensing is not working no error code flashing.. any suggestion
Hello,
Can you please tell me where I can get a new controller in the Montréal, Québec area, J3Y Z9.
Thank you
How to resolve FE error? Please send instructions.
How can I fix the indoor unit shutter? Other functions of the unit work properly but the shutter does not open/work.
hoe do I get my airco back on °C? It stays on the F.