
As an Amazon affiliate, we earn a commision from qualifying purchases.
Read on to find out how to test motor on a Maytag Bravos washer (and more)…..
If your Maytag Bravos washer has displayed error codes F7-E1, F7-E5, or motor speed fault codes, there is a possibility of a motor, capacitor, or shifter-related problem.
Below is how to test connections, shifter motor, optical sensor, and switch on a Maytag Bravos washer – the test will help you be more accurate when diagnosing what’s exactly wrong with the appliance.
How to test motor on a Maytag Bravos washer (Test 3)
Read on to find out how to test motor on a Maytag Bravos washer…..
Please note that the steps apply to a few Maytag Bravos series washers including the Maytag bravos MVWX655DW0 XL washer.
However, there could be minor variations in the steps for some models so check your washer’s specific tech sheet to be sure.
Let’s dive in:
How to test the Drive System on a Maytag Bravos washer (step by step)
First enter Manual Test Mode (see tech sheet) and try to perform the Heavy Agitation test-if the motor starts to run after 15-20 seconds, then it is unlikely the motor, capacitor, control (or wiring harness connections) have an issue.
That said, it is advisable to check the black wire(from the shifter to the control).
Important: The speed wheel -in the transmission- only turns during spin cycle.
Next, while still in the manual test mode, go ahead and try to get your washing machine to spin-if the motor ends up humming briefly and then shutting down (with the lid-lock LED blinking), put the washer to Fault Codes Display Mode(see tech sheet) and see if any shifter/basket speed errors pop up.
These are likely to point you to what is causing the motor problem- which can be something to do with the washer’s shifter/sensor assembly(it could be even that the optical sensor is failing to read the motor speed).
How to test the Drive System on a Maytag Bravos washer –Test 3a (Drive System Shifter)
This test on the shifter assembly checks the connections, shifter motor, the switch, and finally the optical sensor.
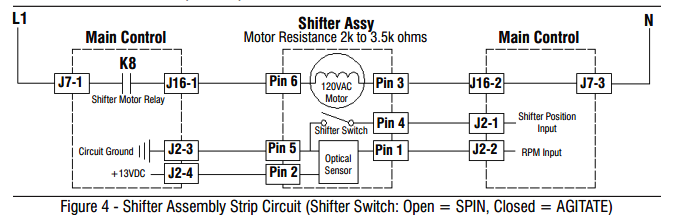
NOTE: See Figure 4(Shifter Assembly Strip Circuit) for correct tests and measurements.
IMPORTANT: Be sure to drain water from the tub before you access the bottom of washer.
Test 1: Functional Check
Step 1:
First check if the shifter and/or the electrical connections have any problems by running both Spin and the Agitate test(You need to put it to Manual Test Mode to perform the two tests- see directions).
Have you done that? If so and you did not succeed, proceed as follows:
Step 2:
Unplug the washer (or disconnect power).
Step 3:
Try to see if the basket can turn freely.
Now, if the basket turns freely, jump to step 4.
On the other hand, if the basket cannot turn freely, try to find out what could be causing the mechanical friction/lockup that is making it not to turn freely(and try to fix it).
Step 4:
Next, remove the console to pave the way to the main control.
Step 5:
Visually verify that J 2 and J 16 connectors are inserted into the main control(all the way)- reconnect the two connectors properly if you found them partially inserted and repeat step 1.
But if it passes the visual checks, jump to step 6(shifter motor testing).
Step 6: Shifter Motor test
Quick Note: Before you start the following electrical check, double check that the cam(on the splutch) is freely moving-and not binding.
Procedure:
Remove connector J 16 from the main control.
With an ohmmeter, test the resistance of your shifter motor across these J 16 connector pinouts:
| Component | J16 connector pinout (Refer to the previous main control wiring diagram) |
| Shifter motor | J16, 1 & 2 |
Now, resistance should be between 2k – 3.5k Ω and you should reconnect J 16 and go to step 7.
Meanwhile, if the values are open/out of range, jump to step 13.
Step 7:
Plug in the washer (or reconnect power).
Grab a voltmeter and set it to AC. You then touch the black probe to J16-2(N) and the red probe to J16-1(L1).
Now activate shifter motor by switching between Spin & Agitate modes.
Energize outputs by following the Manual Test Mode steps(see tech sheet).
NOTE: It will take between 4- 15 seconds for shifter to change state.
If 120 VAC is present, jump to step 9 and if 120 VAC is not present, jump to step 17.
Shifter Switch Test
Grab a voltmeter and set to DC, touch the black probe to J2-3(Circuit Gnd) and the red probe to J2-1(Shifter Switch).
Now, in manual testing mode, switch between Spin & Agitate modes.
The voltage should normally toggle between 0 and +5 VDC (SPIN = +5VDC, AGITATE = 0VDC)
If the voltage corresponds to above setting, jump to step 10.
Otherwise, if voltage doesn’t switch, jump to step 12.
Optical Sensor test:
Grab a voltmeter and set it to DC.
Then touch the black probe to J2-3(Circuit Gnd). The red probe should be connected to J2-4(+13VDC).
Is 13VDC present? If yes, jump to step 11 otherwise jump to step 17.
Step 11:
Activate the Tachometer Verification Mode (you must be under Service Diagnostic Test Modes-see the tech sheet).
Try to turn the basket slowly by hand.
Once you do that, the 4 status LED lights should light up (one at a time) to represent the basket RPM.
Now, if the tachometer verification is not successful, jump to step 12 otherwise jump to step 17.
Step 12:
Unplug washer (or disconnect power).
Tilt the machine back to access its bottom and drive motor area.
Visually inspect the shifter’s electrical connections (all).
If the visual check passes, jump to step 15.
Otherwise, if you notice any loose connections, reconnect them and retry step 1.
Next, get your ohmmeter and check the harness(between shifter and the main control) for continuity using the following pinouts:
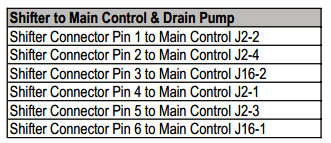
If continuity is there, jump to step 16.
And if there’s no continuity, the lower washer harness need to be replaced- do that and retry step 1.
Step 16
Replace the entire shifter assembly.
Step 17
Replace the washer’s main control- this is the way to go if none of the preceding steps corrects the problem.
TEST #3b: Testing the Drive System–Motor
This test will check the motor, the motor windings, wiring, plus the start capacitor.
Quick Note:See Figure 5(PSC Motor Strip Circuit) for necessary tests and measurements.
Important: Drain all water from the tub before you access the bottom of washer.
Initial test
Check the motor along with electrical connections by running the Gentle/Heavy Agitation test (under Manual Test Mode-see tech sheet).
Confirm that the basket spins clockwise while performing Low/High Spin test(again under Manual Test Mode).
Step-by-step
These steps should be followed if the above step was unsuccessful.
Unplug washer (or disconnect power).
Check (to see) if the basket will actually turn freely.
If the basket turns freely, jump to step 4.
If it won’t determine what could be causing the mechanical friction/lockup.
Step 4
Remove console to gain access to main control.
Visually confirm that J 2 and J 16 connectors are inserted into main control(all the way).
If the visual checks pass, jump to step 6.
And if connectors are inserted improperly, reconnect J 2 and J 16 and retry step 1.
Step 6
Plug in the washer (or reconnect power).
Run Gentle Agitation test(under Manual Test Mode-see the tech sheet)
Step 7
Get a voltmeter (and set it to AC) and connect the black probe to J 16-5(N) and red probe to J 16-6(CW Winding).
If 120 VAC is being cycled ON during the CW rotation, jump to step 8.
And if 120 VAC is not there, go to Test#1
Step 8
Get a voltmeter (and set it to AC) and connect the black probe to J 16-5(N) and red probe to J 16-7(CCW Winding).
If 120 VAC is being cycled ON during the CW rotation, jump to step 9.
And if 120 VAC is not there, go to Test#1
Step 9
Unplug washer (or disconnect power).
Remove connector J 16 from the main control.
Now grab an ohmmeter and check resistance of the motor windings across these J16 connector pinouts:

NOTE: If the console features a cycle selector knob(plus 4 rotary switches), the motor size is 1/3HP.
If resistance values are open/out of range, jump to step 11.
And if resistance values are correct, jump to step 15.
Step 11
Tilt the washer back to gain access drive system.
Step 12
Visually inspect the mounting bracket(as well as electrical connections to motor and shifter).
Verify that wires between motor and harness are connected as here: Black/Blue, Yellow/Yellow, & Red/Red.
Step 13
If the visual check passes, jump to step 13.
If any connections are loose, re-connect the electrical connections, re-assemble motor cover, and retry step 1.
Step 14
Grab an ohmmeter, check harness between main control, motor, and the run capacitor (for continuity) using the test points below:
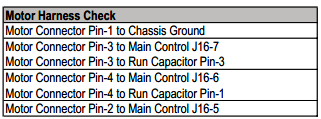
If there’s continuity, jump to step 14.
And if no continuity is found, the lower washer harness should be replaced – do that and retry step 1.
Step 15
Grab an ohmmeter then check resistance of the motor windings at these motor connections:
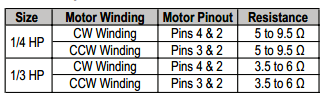
NOTE: If the console features a cycle selector knob(plus 4 rotary switches), the motor size is 1/3HP.
If resistance values are open/out of range, go ahead and replace motor.
And if the values are correct, jump to step 16.
Step 16: Motor Run Capacitor Test
NOTE: A defective capacitor can cause motor to “hum” or not start(or turn slowly).
To discharge the capacitor, touch the leads-of a 20,000Ω resistor- to the 2 terminals.
Dis-connect the wires from capacitor terminals.
Get an ohmmeter and measure resistance across terminals and note the reading.
If you notice a steady jump in resistance, jump to step 16.
If capacitor is shorted/open, replace the capacitor- be sure to calibrate after the replacement- and retry step 1
Step 17
If the above steps fail to correct the motor issue, replace main control– don’t forget to calibrate the washer and run Automatic Test (to verify repair).
ALSO READ:
How to test the control board On Maytag Bravos washer (TEST #1)